

Brighton Polytechnic was the name given to the merger between the School of Art and Brighton College of Technology, which itself became the University of Brighton in 1992. The University of Brighton began replacing it’s PBX system with VoIP in 2014-2015, meaning that many older style phones were disposed of. Brighton Polytechnic existed between 1970 and 1992, so i assume this phone is at least 25 years old, quite the antique in technology terms. I managed to get hold of one, as i thought it’d be a nice souvenir and there aren’t going to be many Brighton Polytechnic branded telephones out there. However, this souvenir needed some work..

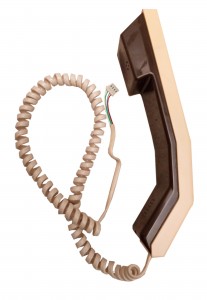
The telephone when i first received it, complete with decades old stickers, showing it had multiple telephone extensions over its lifespan, as well as the grotty cables, in need of a cleaning.

Inside the handset, red and green are for the speaker, white and blue for the microphone. The handset was dismantled to remove the cable, luckily the telephone manufacturer was kind enough to use connectors, meaning desoldering was not required.
Above, completely cleaned handset reassembled. Cable was cleaned in the same manor as the cable below, the plastic was washed with soapy water to remove the grot, then left to dry, then reassembled. The connector on the other end of the cable looks to be a JST-4 connector.

Above, the other cable that needed desperately cleaning. This cable was disconnected, coiled and soaked in WD-40 for a few hours, then wiped clean with tissue. 90% of the dirt came off with the WD-40, the remaining 10% and WD-40 came off with hot soapy water. This is the same process for the coiled handset cable, although dealing with the coils was a nightmare! Sadly, the 431A connector, on the end that plugs into the wall is missing it’s retaining clip, so maybe a future project will be to replace this connector.
There is some discussion as to if WD-40 will cause the plastics in the phone to deteriorate, i was unable to fully determine the plastics used to manufacture the phone (the cables are probably PVC and the case is probably ????), so i dealt with this by limiting the time in contact with WD-40 and then cleaning it off as soon as possible.

The main telephone PCB, showing internals, along with the mechanical switches that push the “hang up” switch. The PCB was removed and cleaned. The keypad was the dirtiest of this part, it was cleaned with a toothbrush and water, then the whole thing was reassembled. You can see the two ICs XXXX and XXXX.

The base of the telephone, showing the piezoelectric buzzer as well as a added weight to give the phone some extra weight. Also note the four wall mounting points, the manufacturer was serious about this telephone hanging correctly!

Above, the cleaned telephone case, this piece was the worse of all, as much of the labelling was removed by hand, then sprayed with WD-40, labelling removed again, then washed under soapy water to remove the final sticky debris as well as the WD-40. This piece came out really well in the end. There is a slight difference in colour where the sticker originally was, it probably prevented UV light from ageing the plastic. I considered using a Retrobrite technique, as seen in The 8-Bit Guy’s YouTube videos, but really i wasn’t sure about the effect it would have on the plastic. Apologies for the blurry photograph.

Above, the telephone is finally fully assembled. The colouring is different as i took this photograph the morning after i’d finished cleaning everything. It now sits on my desk, a reminder of my time at Brighton University.
Recent Comments